Pay in installments of $7.10 with
 ,
,
 and
and

Shipping Estimate
USA
- USA
- CAN
- USA
- CAN
Ships within 48 hours · Estimated delivery Oct 19 - Oct 24
 Promo Codes Available:
For Your Every Summer RSVP, with Code: SUMMER15
Description
solar panel roof top tent SolarKing 360 Watt Roof Top Tent Solar Panel for Camp King RTT & CampAdd a 360W solar panel to your Camp King RTT and Camp King Outback Series canopy Camper! The SolarKing panel is uniquely designed to neatly fit on the top of the Camp King Rooftop Tent and the Camp King Outback canopy camper. The SolarKing is permanently mounted to the top of the aluminum CampKing shell via 9775 adhesive backings. It's always deployed, soaking up the rays on top of your rig with zero effort on your part. Best of all, these are the
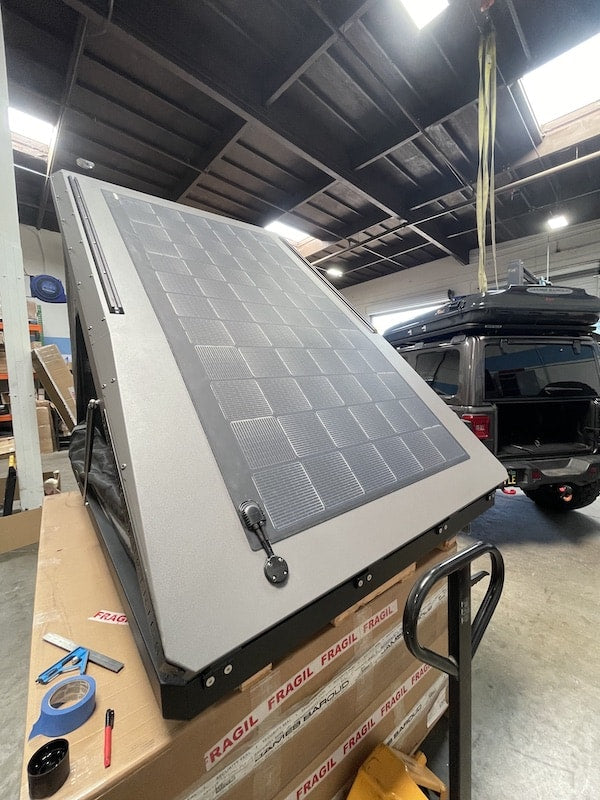
Add a 360W solar panel to your Camp King RTT and Camp King Outback Series canopy Camper! The SolarKing panel is uniquely designed to neatly fit on the top of the Camp King Rooftop Tent and the Camp King Outback canopy camper.
The SolarKing is permanently mounted to the top of the aluminum CampKing shell via 9775 adhesive backings. It's always deployed, soaking up the rays on top of your rig with zero effort on your part. Best of all, these are the most rugged panels on the market, ready for the abuse associated with prolonged off-road use.
Solar King Roof Top Tent Solar Panel for Camp King RTT and Outback Series Key Features
-
Constructed with off-road-ready materials: fully sealed, low profile junction box is impenetrable to dirt and water; adhesive backing dampens transfer of vibrations to solar array; busbar-free PV cells with redundant connectivity to withstand physical and thermal extremes.
-
Angular positioning complements the CampKing wedge design: Morning and afternoon solar incidence angle for panels is improved when the CampKing Roof is opened (angle vehicle so the roof is pointed toward sun when the CampKing is open). Panel positioning, while the CampKing is closed, is ideal for overhead, mid-day sun. This often corresponds to times when tent is closed for transit or parked.
-
Better battery performance: It's no secret that battery longevity depends on the charge profile usage habits of the electrical system. Keep your 12V battery in peak condition by maintaining healthy charging habits and not overdrawing your aux battery.
- Built-in convenience: No need to remember to pack it, plug it in, or set it up; the SolarKing is permanently on your CampKing, working hard to convert photons into colder beverages or brighter nights.
- Portable & practical: 360W panel provides you ample power to your 12volt system. Run fridge/freezers, lights, inverters, and a host of overland accessories with little fear of depleting your battery. Adventure further and longer knowing you have 360 watts of power overhead.
- Designed by Rooftop tent experts: Rhino Adventure Gear is the USA importer / distributor for Camp King Industries products. We worked with Merlin to provide our customers with the most efficient rugged panels on the market. To date, we have installed hundreds of Solarhawks on Skycamp rooftop tents with incredible results. With the SolarKing, we can do the same for the CampKing RTT and Outback. As enthusiasts ourselves, it was imperative for us to the best solar solution. Our owner has run the SolarKing panel on his Camp King RTT for years with impressive results. Extensive real-world overland product testing has ensured the SolarKing is exactly what serious off-grid campers need to level up their off road game and unlock bigger adventures.
- Warranty is indicative of high-quality: Material & Workmanship- 5 years. Power output- 25 years with 90% of nominal rated output for years 1-10 and 80% of nominal rated output for years 11- 25.
SolarKing 360W RTT / OutbackSeries Solar Panel- Technical Specifications
The architecture of Photovoltaic Cells arrayed into SolarKing panels
- 360 Watt, 23.5% efficient, monocrystalline array yielding a significantly higher power density than a thin-film panel.
- Merlin's monocrystalline cells are highly efficient and not prone to moisture sensitivity
- Merlin's patented grid technology dwarfs conventional connectivity levels afforded by older solar tech with busbars and also provides a robust & durable foundation analogous to rebar in cement.
- Redundancy of connectivity improves panel durability and resistance to thermomechanical stress (aka overlanding adventures).
- Elimination of failure-prone aluminum busbars results in a more robust and longer-lasting solar panel compared to the more widely available portable solar panels distributed by big-box outdoor stores and Amazon.
SolarKing Battery & Charge Controller Compatibility
- Compatible with 12V batteries including lithium batteries, lead-acid batteries, and AGM batteries.
- An MPPT charge controller is required. This means that portable battery units with built-in non-MPPT charge controllers will not work with the SolarKing (this includes the Dometic PLB40).
- The GoalZero Yeti Portable Power Stations may not compatible with the SolarKing. Please check the VOC input rating of your charge controller for compatibility.
- Your charge controller input rating must exceed 23.90 volts
SolarKing Wiring Specifications
- Array terminates in fully-sealed, low-profile (18mm high) junction box.
- 36" 10 AWG insulated wiring runs from the junction box to
SolarKing Adhesive Backing Materials
- Backing 9775 adhesive backing
- Permanent adhesive - once it's on, it's staying put
How to Install a SolarKing panel on your CampKing RTT or CampKing Outback Series canopy camper
- Clean the CampKing aluminum shell with soap and water, then with alcohol (ideally isopropanol) before application.
- We suggest positioning the SolarKing panel so the junction box of the panel is facing the front of the CampKing. This way you can run your wires by avoiding the opening and closing mechanisms of the CampKing.
- Lay the SolarKing module onto the CampKing into position centering it front to back and side to side as desired. You will have to play in either direct - us as you see fit.
- When in the proper position on the tent, peel the front adhesive backing and stick the front of the panel down to the CampKing. You will then unpeel and stick the remaining adhesive from the front to the back. When the entire panel is down and stuck, apply pressure around the entire rim of the panel with your hands, 30 seconds or so at a time. Make sure there are no air gaps between the panel and tent. Use a heat gun as needed to ensure proper adhesion.
- You can elect to use your preferred waterproof clam to feed the wire through to the inside of your camping, or simply route the wires around the front of the unit. The best wire routing approach depends on the installer's skill level and the 12volt system specifics.
- Connect to the positive and negative wire of the panel as instructed by your MPPT charge controller.
PLEASE NOTE: It is your responsibility to ensure you fully understand how solar panels will integrate with your 12V system (starter battery, aux battery, charge controller, powered appliances etc). There are nearly infinite setup options possible, certainly more than we can describe here. There are excellent educational resources about 12V systems and solar panels available online. Additional items such as a REDARC DC-DC charge controller, lithium aux battery, solar charge converter, or wiring connectors may be needed depending on how your setup is configured and how you intend to use it. The SolarKing solar panel is not designed to have a phone, light, or fridge plugged directly into the panel output cable; rather it works as part of a 12V battery system via a required charge controller. (Just like any 12v solar panel).
If you currently only have the battery that came with your vehicle and you are looking to install solar for camping, please reach out and we can discuss a more inclusive 12V system package tailored to your needs.
As with all Rhino Adventure Gear products, we offer installation at either of our two California shops- located in San Marcos, San Diego & Fremont, San Francisco.
Shipping SolarKing RTT Solar Panels
Due to the size of the SolarKing, the panel is shipped on a pallet via freight. Please reach out to discuss shipping options. Alternatively, free warehouse pick-up is available at each of our two locations.
Shipping Notes
- Free Standard Shipping on $100+ Orders to the USA.
- Except Preorder products are shipped in 48 hours.
- Delivery to the USA:
- Standard Shipping : 3-10 business days
- If time is of the essence, please consider selecting expedited delivery for faster service.
Exchange/Return Notes
- We offer a 30-day return/exchange service after receiving.
- Final sale items are not eligible for returns or exchanges.
- To process your return/exchange, please contact us at [email protected]
- Please click here for more details>>> Return & Exchange Policy